Hydroponic Bucket System
You are on Page 6 of our ten page series on hydroponic bucket systems. Click on any of the below pages to jump to that page.
Page 1 Page 2 Page 3 Page 4 Page 5 Page 6 Page 7 Page 8 Page 9 Page 10
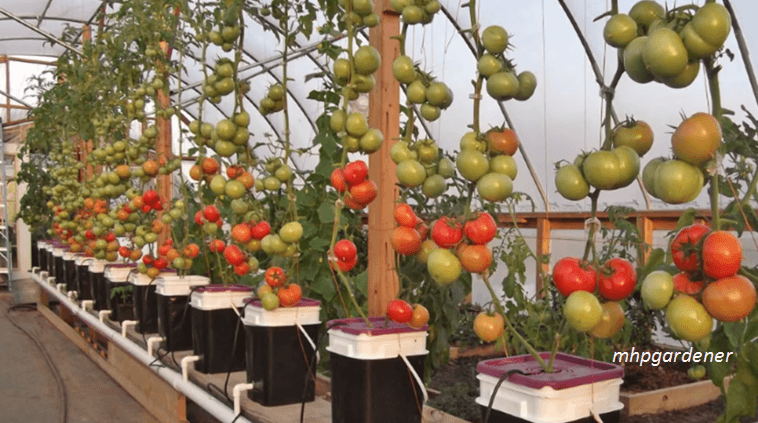
A handsome DIY system composed of buckets and plumbing supplies available from most hardware or home improvement stores. Note how heavily laden the vines are with fruit; this DIY system would give any commercial system a run for its money. Photo courtesy of MHPGardener; more information on this system is available on MHPGardener's Youtube video.
Do It Yourself Potential
A hydroponic bucket system is very much within the realm of the DIY-er. All the major components can be built and/or adapted from common materials. Buckets and containers of various sizes, drip irrigation components and drain lines, if any, can all be found at most hardware stores, home improvement stores, etc. The main concern would be the buckets themselves. Any bucket, in fact any appropriately sized container, can be used for a bucket system. That being said, a grower should consider the following before trying to adapt materials for a bucket system:
1. The intended number of plants per bucket, and the number of buckets needed in the system. If a grower wants to use buckets which are laying around the house, compare their volume to those buckets which other growers use for that same crop. If the intended buckets are considerably bigger or smaller than commercial buckets for the same crop, either increase or reduce the number of plants per bucket. For instance, if a grower wants to use a few small household buckets for tomatoes, check the capacity listed for commercial bato buckets intended for tomatoes. If the household buckets are about the same size as the commercial buckets, feel free to put two plants into each. If they’re smaller, cut that down to one plant per bucket. If they’re considerably larger, consider either a third plant, or not filling it all the way to the top. In general, more room is a good thing, so oversized buckets are better than undersized buckets.
2. Whether each bucket will have a reservoir at the bottom. This is a fairly big issue, because that reservoir is an important safety feature in case the drip irrigation system clogs up. Give this careful thought. The cost of a commercial bucket is insignificant versus the cost of losing the plant in full production due to a clogged drip line. Commercial bato buckets have the reservoir molded right into the bottom of the bucket. The best way to duplicate this in a DIY system is to locate the drain hole higher than planned. Since the drain line will only empty the bucket down to that point, anything below that point will serve as a reservoir. Growers who want to go the DIY route, may want to carefully study the volumes and ratios used for commercial buckets, and try to match that in the DIY version.
3. Whether the bucket will have a drain line, versus simply draining to waste. This is another important issue, usually for regulatory and/or hygiene reasons. Commercial bato buckets will not only have drain openings pre-drilled into the buckets, growers can usually also order the accompanying hardware at the same time as the buckets. That makes installation very straightforward. Matching that setup on a DIY basis will require either careful study of existing systems, and/or some experimentation. The cost saved by going with a DIY approach may be washed out thanks to the extra time required to match it.
4. If the buckets are intended to be outside (versus in a greenhouse) they need to be UV-resistant. Chalk this one up to “learned the hard way”: the vast majority of household containers, such as Rubbermaid tubs and light-duty buckets, are not intended for heavy, long-term outdoor use. Even a few months in direct sunlight will turn the plastic brittle, and it’ll start to disintegrate even before the first growing season is over. This problem is not as pronounced for indoor growing, but even then most Rubbermaid containers and similar products are not made of rugged enough materials. They will crack with the weight of the plant, the growing media and the irrigation solution. Annoyingly, they will often crack halfway through a growing season when the plants are in full production, at which point the grower has to do a lot of repair work and/or cleanup work to stay ahead of the damage. The best bet here for DIY’ers is to work with heavy-duty livestock buckets. These are not only rated for outdoor use but also expected to get a lot of abuse, so they hold up better.
5. The buckets or containers need to be a solid color; clear or opaque colors will allow algae to grow within the containers. Algae love the growing conditions within a hydroponic system, and will grow anywhere they have a chance to get started. After they get going, they will start to siphon off the nutrients intended for the crop. They can be a pain to clean up, and can infect both drain lines and irrigation lines if given the chance to do so. For this reason, ALL materials which hold either the plants and/or the nutrient solution should be a solid color, preferably dark. Even a solid white color can still be light enough inside to support algae growth. That’s why most bato buckets, drain lines and drip irrigation lines are either dark blue or black.
6. Cost of dedicated hydroponic buckets from a hydroponics supplier, versus cost of similar-sized buckets from a hardware store. It’s very tempting to look around the house, pick a spare bucket, get some aquarium tubing and set up a quickie, inexpensive bucket system. And this system will work, for awhile. This approach can at least give growers some practice with the in’s and out’s of a bucket system. However, such systems will almost certainly break down very quickly, thanks to all the issues we’ve already described above. If a grower is at that experimental stage, this trade-off might be fine. If, however, a grower has started with a cheap DIY system and now wants to expand, stop and consider the costs/benefits of buying in commercial grade materials for that expansion. There is precious little savings over the long term, if equipment can’t hold up to the rigors of the job for more than a few months.
BACK NEXT
Click any of the following links to jump to that page:
Page 1 Page 2 Page 3 Page 4 Page 5 Page 6 Page 7 Page 8 Page 9 Page 10